Get Started with Extensions
Introduction
Build powerful PBX and IVR functionality with ease
Extensions
Extensions are 1-6 digit numbers in the Programmable Voice API that contain details on how to connect calls to a specific destination, such as a phone number or SIP User. Extensions act as shortcuts that make intra-company dialing simpler or provide the building blocks for an PBX on your company’s main phone line.
Additionally, when used in conjunction with SIP Registration, Extensions allow you to give each employee in your company a unique phone line while only purchasing a single phone number.
Use Cases
- PBX Replacement // create or replace your existing private branch exchange to direct phone traffic to the right employee(s)
- IVR Replacement // create or replace your existing IVR
- Disaster Recovery // create a simplified or even fully redundant phone experience when your primary phone system is down
- Enable Internal Calling // create extensions for your employees to connect with one another internally without paying PSTN fees
How It Works
Voxology Extensions give you a shortcut to building PBX and IVR functionaity with Programmable Voice
Extensions point calls to specific Call Flow controls in the Programmable Voice API. Each Extension is assigned an HTTP Callback Configuration, or uses the Extensions Default Callback Configuration, to designate the URLs pointing Voxology where to fetch the scripts of Voxology Call Flow Actions in order to programmatically control phone calls. NOTE: these call flow scripts can be delivered dynamically by your server in a callback/response loop or be hosted as static Call Flow scripts (reducing both latency and the need for you to keep track of state on each call).
Extension Data
All Extensions can store information on the destination or person they point to, such as the phone number or SIP endpoint to forward the call to, or working hours and an email address to forward voicemail messages to. This information can be stored in the extension_data object on each Extension. All data should be provided in a JSON object like the example Extension below.
Example API Response // View Extension
{
   "extension": "1234",
   "description": "Voxology Extensions Getting Started",
   "created_on": "2022-01-01T00:00:00.520Z",
   "updated_on": "2022-01-01T00:00:00.571Z",
   "extension_data": {
       "sip_user": "sip:1234@domain.trunk.voxolo.gy",
       "mobile_no": "+19215551234",
       "work_hours_start": "09:00",
       "work_hours_end": "17:00",
       "email": "voicemails@company.com"
   }
}
Extension Redirect
The simplest way to write a Call Flow that connects to an Extension’s destination is to use the REDIRECTEXTENSION Call Flow Action. When used on a call, this Call Flow Action immediately redirects the call to use the Call Flow Configuration assigned to the Extension specified. Many users find this simpler and more organized than writing a monolithic Call Flow to handle all use cases.
Getting Started
Get started with the basics of Voxology's Extensions.
Set Up Extension
Overview
This tutorial is a step-by-step guide to creating and using Extensions in Programmable Voice.
Prerequisites
- Phone Numbers Getting Started Guide // Be sure you have completed the Provision Phone Number tutorial and have provisioned a phone number you can use to test with.
- Programmable Voice Getting Started Guide // Make sure that you have completed both the Receive Calls and Make Calls tutorial.
Tutorial
1. Create and Configure an Extension
To use extensions, you first need to create and configure an extension to forward to the desired destination.
A. Go to Manage Extensions page in the Portal.
B. Enter a 1-6 digit number of your choice into the Extension field and a useful descriptor in the Description field.
C. Click Create.

D. ‘Copy/Paste’ the following valid JSON into the Extension Data field on the Extension Detail page, replacing the example phone number with your own number in E.164 format:
{“transfer_to”:”+15551234567”}.
E. Click Save.
Example API Request // Create Extension
curl -X POST \
 https://api.voxolo.gy/v1/Extensions \
 -H 'Cache-Control: no-cache' \
 -H 'Content-Type: application/json' \
 -H 'X-API-Key: YOUR_API_KEY' \
 -d '{
   "extension":"123",
   "description":"example extension one",
   “extension_data”: {
       "transfer_to": "+155541234567"
    }
}'
2. Create A Call Flow to Transfer calls to Extension
Now that you have an Extension created on your Voxology Application, you need to write a Call Flow to redirect calls to either a phone number or a SIP destination. The example Call Flow below can be used for simplicity.
A. ‘Copy/Paste’ the example Call Flow below into a text editor. NOTE: In order for this Call Flow to work for your Extension, the Extension Data field needs to have a
transfer_toproperty with a valid phone number or SIP destination. If you did not set this property in the previous step, please do so now or you can enter your number/SIP destination directly into the Call Flow in E.164 format.
{
   "actions":[
       {
           "type":"TRANSFER",
           "params":{
               "no":"${extensionData.transfer_to}"
           }
       },
       {
           "type":"HANGUP"
       }
   ]
}
B. Save as a JSON file.
Now you will need to host the Call Flow and configure your Extensions Default Callback Configuration to control redirects to your Extensions.
3. Host Call Flow
Your Extension’s Call Flow needs to be returned as the response to Voxology’s HTTP callback requests which are sent when the REDIRECTEXTENSION action is initiated in a Call Flow (step 5, below). This can be done by either hosting the Call Flow as a static file in a cloud storage service where it can be fetched by the callback request, such as AWS S3, Azure or Google Cloud, or by programming your server to return the Call Flow in response to the callback request. We’ll use a static Call Flow hosted in AWS S3 for this guide.
A. Sign into the AWS Management Console and navigate to S3.
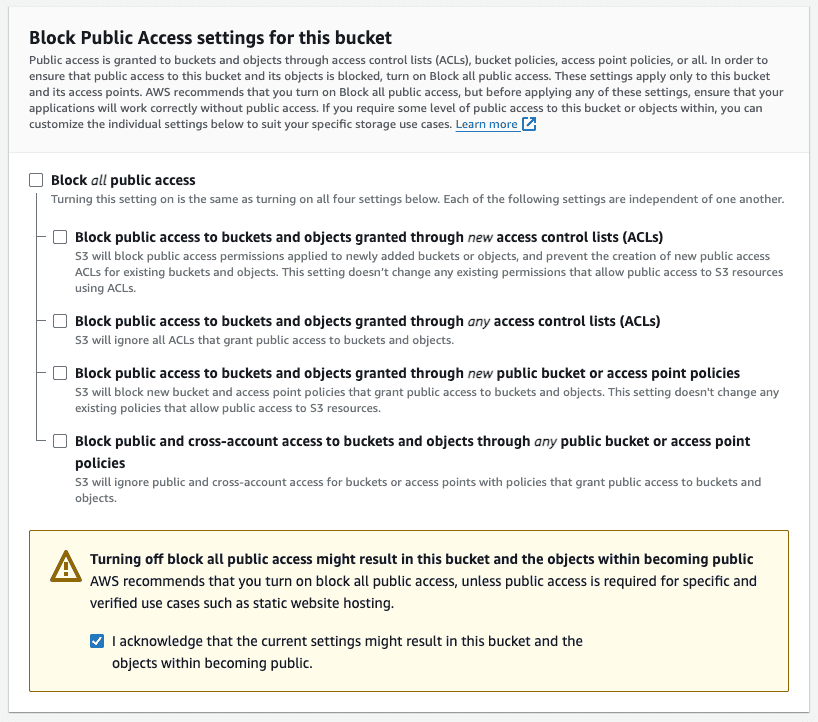
B. Create a new bucket and deselect the box that blocks public access.
C. Check the box acknowledging you are allowing objects in the bucket to be publicly available.
D. Click Create Bucket.
E. Upload the JSON file you created with the Call Flow script.
F. Once uploaded, click the object to view the Properties and ‘Copy’ the Object URL.
4. Define your Extensions Default Callback Configuration
To assign the Call Flow to your Extension, set the 'Extensions Default Callback Configuration' which is inherited by all Extensions. You can set Extension-specific Callback Configurations if desired.
A. Go to the Extensions Default Config page/tab in the Portal.
B. Disable the Inherit Default Callback Configuration from Application toggle, and then enable the Designated a Callback URL to where Voxology will send Callback Requests toggle to display the Callback Configuration form.
C. ‘Paste’ the “Object URL” from your S3 Object copied in the previous step into the Callback URL field.
D. Set the Callback Method field to
GET.
E. Click Save.

Example API Request // Assign Extensions Default Callback Configuration
curl -X PUT \
 'https://api.voxolo.gy/v1/CallFlows/Configurations/Extensions/Default \
 -H 'Cache-Control: no-cache' \
 -H 'Content-Type: application/json' \
 -H 'X-API-Key: YOUR_API_KEY' \
 -d '{
   "callback": {
     "method": "POST",
     "url": "https://myserver.com/ivr_app/extensions/callback-handler",
     "content_type": "application/json",
     "headers": {
       "X-Custom-Name": "custom header value"
     }
   },
   "callback_failover": {
     "method": "GET",
     "url": "https://myserver.com/ivr_app/extensions/callback-handler-failover",
     "content_type": "application/json"
   },
   "custom_data": {
     "foo": "bar"
   }
 }'
5. Set Up Inbound IVR Call Flow
With your Extension now fully configured and ready to use, the last step is to set up a Call Flow (IVR) that can be used to connect calls to your Extension. For convenience, we’ve included another simple Call Flow example you can use.
This Call Flow will prompt a user to enter an extension and then redirect the call to fetch the Call Flow assigned to that Extension. Once the Extension Call Flow takes control of the call, it will initiate the TRANSFER to the destination you defined in the previous steps.
A. Host the Call Flow below in your storage service (repeating step 3 above), and ‘Copy’ the Object URL.
{
   "actions":[
       {
           "type":"COLLECT",
           "actions": [
               {
                   "type":"SAY",
                   "params":{
                       "text":"Enter the extension you would like to reach now."
                   }
               }
           ],
           "params": {
               "num_digits":3,
               "timeout":5000
           }
       },
       {
           "type":"REDIRECTEXTENSION",
           "params":{
               "extension":"${keyPresses}"
           }
       }
   ]
}
B. Go to the Manage Phone Numbers page in the Portal.
C. Select an Inbound Number on your Application that’s currently assigned to
Call Flows API, or buy a new phone number.
D. Click on the Callback Configuration tab.
E. Disable the Inherit Default Callback Configuration from Application toggle, and then enable the Designated a Callback URL to where Voxology will send Callback Requests toggle to display the Callback Configuration form.
F. ‘Paste’ the “Object URL” (from S3) into the Callback URL field.
G. Set the Callback Method field to
GET.
G. Click Save.
6. Call Your Number and Enter Your Extension
Now, call your inbound number and enter your Extension when prompted. If set up correctly, your call will be transferred to whichever destination you chose in your Extension. Happy extension calling!