Get Started with SIP Registration
Introduction
Connect your SIP Device to Voxology.
SIP Registration
Voxology’s SIP Registration service enables you to create and manage SIP User credentials through the Voxology API or Portal. SIP Users can be used to connect a variety of devices to one another or to the PSTN, including VoIP phones, softphones, SIP-enabled WebRTC clients, or a PBX.
Use Cases
- VoIP Desk Phones // register desk phones to make and receive phone calls
- Softphones // register softphones to make and receive phone calls
- WebRTC Clients // register SIP-enabled WebRTC clients to make and receive phone calls
- PBX Endpoints // create endpoint agnostic PBX
How It Works
Voxology’s SIP Users allow you to connect SIP Devices to the Voxology Platform.
A SIP User uses the SIP Registration protocol to authenticate SIP devices with the Voxology platform. Through SIP Registration, a two-way connection is created between your SIP device and Voxology allowing your SIP User to send outbound calls through Voxology and for Voxology to forward inbound calls to your SIP User. SIP Users can be used in conjunction with Programmable Voice or SIP Trunking.
Default SIP Domain
Each Voxology Application needs at least one SIP Domain assigned before creating SIP Users. This is the unique namespace that will serve as the endpoint your SIP client will be sending SIP Registration requests to in order to authenticate each SIP User on your application. A single domain can be used for your entire Application or you can create a unique domain per subaccount.
Username and Password
The username and password for each SIP User are used to authenticate SIP devices when a REGISTER request is made. The username also helps specify which device to forward inbound calls when using multiple SIP Users on a single domain.
Inbound URI
The Inbound URI uses your SIP Domain and the username to create a unique endpoint for your SIP User. During SIP Registration, this endpoint is configured to point at the registered SIP Device. Once authenticated, any SIP calls sent to this URI will connect to the device registered to your SIP User. All Inbound URIs follow the same pattern: username@default-sip-domain.
External Caller ID
The number used as the Caller ID for any call placed to an external (typically PSTN) destination.
Internal Caller ID
The number used as the Caller ID for any call placed to another SIP User on your Voxology application - often the user’s extension.
Internal CNAM
The Caller ID Name used on any call placed to another SIP user on your Voxology application.
Example API Response // View SIP User
{
   "created_on": "2021-08-12T22:14:33.000Z",
   "updated_on": "2024-02-13T22:08:37.000Z",
   "user_id": "aaaa-bbbbb-ccccc-dddd-eeeee",
   "status": "active",
   "description": "How It Works",
   "firstname": "SipRegistration",
   "lastname": "User",
   "country": null,
   "uri": "/v1/Users/aaaa-bbbbb-ccccc-dddd-eeeee",
   "sip": {
       "authentication": {
           "username": "15551234567",
           "password": null
       },
       "domain": "user-test.sip.user.voxolo.gy",
       "outbound": {
           "assigned_to": "CallFlows",
           "caller_id": {
               "external_no": null,
               "internal_no": null,
               "internal_cnam": null
           }
       },
       "transport": "UDP",
       "media": "RTP",
       "inbound": {
           "uri": "sip:15551234567@user-test.sip.user.voxolo.gy"
       }
   },
   "app_id": "aaaa-bbbbb-ccccc-dddd-eeeee",
   "subaccount_id": null
}
Getting Started
Get started with the basics of Voxology's SIP Users.
Register SIP Device
Overview
This tutorial is a step-by-step guide to setting up a SIP User and registering a device. Then you can configure calling to and from your device using either SIP Trunking or Programmable Voice - both tutorials found below. For the purposes of this guide, we’ll assume you are working at the Application (Parent) level. Everything configured here can also be accomplished in a specific Subaccount.
Prerequisites
- Create an Account // Sign up for a Voxology Portal Account.
- Make a Payment // After you sign up, Make a Payment in order to start registering SIP devices.
Tutorial
1. Create A New Application or Subaccount
If you have previously configured use cases with your Voxology Application, create a new parent Application or Subaccount to use SIP Users. The steps in this guide will ultimately stomp on the Default Callback Configuration and may impact other existing use cases.
If this is your first time using Voxology, use the standard “My First App” Application on your Voxology account. If not, go to the Manage Applications or Manage Subaccounts page in the Portal to create a new one.
2. Provision an Inbound Phone Number
To make and receive calls to your SIP User, you need to search for an available phone number and provision it using either the Portal or our API. If you need help provisioning a phone number, please see our ‘Provision Phone Number’ tutorial.
3. Create Default SIP Domain
Before you create a SIP User, you need to create a unique Default SIP Authentication Domain.
A. Go to User Default Settings in the Portal.
B. Create your unique Default SIP Authentication Domain; it must be alphanumeric and may contain hyphens between characters.
C. Click Save.
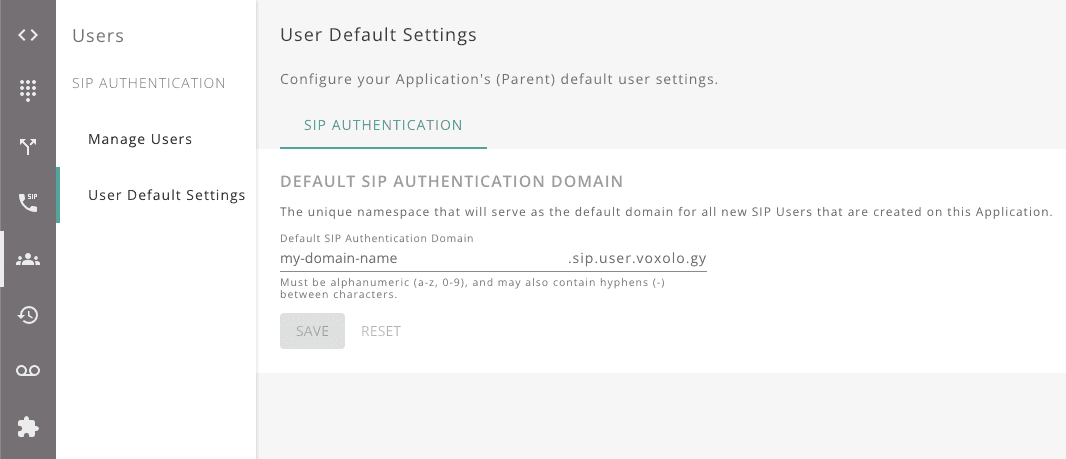
NOTE: Please note that if you change your Default SIP Authentication Domain in the future, this will impact any pre-existing users if you choose to edit them.
4. Create a SIP User
Now you can create a SIP User.
A. Go to the Manage Users page in the Portal.
B. Click the + (plus) button in the top right corner.
C. Fill out the form sections:
- Basic Info // This is descriptive information about the user for your reference.
- SIP Authentication // Information used to authenticate the user with SIP Registration requests. The username will also be used in the inbound SIP URI after creation which you will use to forward inbound calls to the user’s SIP device. When placing outbound calls from a SIP User through a SIP Trunk, the username serves as the caller ID and must be a valid phone number. For the purposes of this tutorial, use the number you provisioned in step 2, above.
- Assigned To // Controls which Voxology service will handle outbound calls placed from this user’s device. You can choose between a specific Outbound SIP Trunk or the Call Flows API. The Parking Lot is an option for any User you’d like to temporarily disable without deleting entirely.
- Caller ID // Sets the Caller ID for any outbound call placed from the SIP user. The External Caller ID can be set to any Phone Number or Caller ID provisioned to your Voxology Application. This is used on any call placed to an external destination. The Internal Caller ID (alphanumeric, up to 6 characters) and the Internal Caller ID Name (alphanumeric, up to 15 characters) are completely customizable and are only used on calls placed to other registered SIP Users on your Application.
C. Click the Create button.
You are now ready to assign this User to a VoIP Phone.
5. Register a VoIP Phone
The VoIP phone is the device or software client that is going to ultimately be sending or receiving phone calls for your SIP User. To do that, the VoIP phone needs to be connected to the Voxology platform. This is done through SIP Registration. Part of the SIP protocol is a REGISTER request which uses the username, password, and domain you created in the previous steps, to authenticate the VoIP phone and establish the connection with Voxology.
The exact steps to set up your unique VoIP phone will no doubt vary slightly based on the device type. For the sake of this guide, we’ll be using the Bria softphone as a reference. Bria offers a 14-day free trial of their softphone if you’re new to this and looking for a simple option to help you understand the basics.
A. Create an account with Bria.
B. Create a new Voice Server/Service under the Voice and Video settings tab.
C. In the General settings for your Voice Configuration, enter the “Domain”, “Username” and “Password” from your previously created SIP User into the Domain, SIP Username/Call Extension, and SIP/Voice Password fields respectively.
D. Save and close when complete.
Now you can download the Bria Softphone client and sign in to your account. You’ll find your newly created Voice configuration available to use under Accounts. If the Account shows a green status, the connection of the softphone to Voxology through your SIP user was successful. You can now configure your SIP device calling using either SIP Trunking or Programmable Voice - both tutorials found below.
Configure SIP Device Calling with SIP Trunking
Overview
This tutorial is a step-by-step guide to make and receive calls from a registered SIP device using SIP Trunking. This is most useful if you are planning to add Voxology as a new carrier to your existing PBX. Please note that you can also configure calling to and from a registered SIP device using Programmable Voice. In order for your SIP User to receive calls, you need to configure an inbound Phone Number and SIP Trunk to forward calls to the Inbound URI of your SIP user.
Prerequisites
- Phone Numbers Getting Started Guide // Be sure you have completed the Provision Phone Number tutorial and have provisioned a phone number you can use to test with.
- SIP Trunking Getting Started Guide // Familiarize yourself with the basics of Voxology SIP Trunking.
- ‘Register SIP Device’ Tutorial // Make sure that you have completed the tutorial to Register SIP Device.
Tutorial
1. Create and Configure an Inbound SIP Trunk
Before creating an Inbound SIP Trunk, ‘Copy’ the Inbound URI from your SIP User and keep it somewhere readily accessible as you’ll need it to configure your inbound SIP Trunk.
NOTE: To find the “Inbound URI”, go to the Manage Users page in the Portal. Select the desired SIP User and click on the SIP Authentication tab. ‘Copy’ the Inbound URI.
A. Go to the Manage SIP Trunks page in the Portal.
B. Click the + (plus) button in the top right corner.
C. The Direction field should be set to
Inbound (Origination).
D. Fill out the form sections, and ‘Paste’ the “Inbound URI” into the Inbound Destination field.
E. Click Create.
2. Assign Your Phone Number to the Inbound SIP Trunk.
The next step is to assign your Inbound Number to your new trunk.
A. Go to the Manage Phone Numbers page in the Portal.
B. Select the number you provisioned in the previous steps.
C. In the Assigned To field, select
SIP Trunk, and then select the Inbound Trunk you just created.
D. Click Save.
3. Receive Calls To Your Registered Device
Using a different phone, place a test call to the number you just assigned to your trunk. If you properly configured your SIP User, you should receive a call on your SIP device.
4. Create and Configure Outbound SIP Trunk
Now, it’s time to create and configure an Outbound SIP Trunk to place calls from your registered SIP device.
NOTE: In order to use an Outbound SIP Trunk to place calls from a SIP User, the “username” must be a valid 10-digit number. Any other username will result in rejected outbound calls. For this reason, it's common to use the “Inbound Number” you just assigned to your Inbound Trunk in step 2 as the username as well.
A. Go to the Manage SIP Trunks page in the Portal.
B. Click the + (plus) button in the top right corner.
C. The Direction field should be set to
Outbound (Termination).
D. Click Create.
5. Update your SIP User’s Outbound Settings
Now that you have created an Outbound SIP Trunk, you need to update your SIP User’s Outbound Settings to use the new SIP Trunk
A. Go to the Manage Users page in the Portal.
B. Select your SIP User.
C. Click on the SIP Authentication tab.
D. Under the Outbound Settings > Assigned To field, select
SIP Trunkand then select the new SIP Trunk you just created.
E. Click Save.
6. Make A Call From Your Registered Device
The SIP Registration process creates a link between your softphone and the SIP Domain you created for your Outbound Trunk, sending any calls from your device to that domain in the Voxology platform. If you have configured your Outbound SIP Trunk and SIP User settings correctly, you can now place a test call from your registered SIP device.
Configure SIP Device Calling with Programmable Voice
Overview
This tutorial is a step-by-step guide to make and receive calls from a registered SIP device using Programmable Voice. Please note that you can also configure calling to and from a registered SIP device using SIP Trunking.
Prerequisites
- Phone Numbers Getting Started Guide // Be sure you have completed the Provision Phone Number tutorial and have provisioned a phone number you can use to test with.
- Programmable Voice Getting Started Guide // Make sure that you have completed both the Receive Calls and Make Calls tutorial.
- ‘Register SIP Device’ Tutorial // Make sure that you have completed the tutorial to Register SIP Device.
Tutorial
1. Assign Your Phone Number to Call Flows API.
The new phone number you provisioned during the ‘Register SIP Device’ tutorial (Step 2) should already be assigned to Call Flow API, by default. To verify:
A. Go to the Manage Phone Numbers page in the Portal.
B. Select your new number.
C. Check the Assigned To field to ensure that your number is assigned to:
Call Flows API. If not, make it so and click Save.
2. Update your SIP User’s Outbound Settings to Call Flows API
The new SIP User you created during the ‘Register SIP Device’ tutorial (Step 4) should already have the Outbound Settings assigned to Call Flow API, by default. To verify:
A. Go to the Manage Users page in the Portal.
B. Select your SIP User.
C. Click on the SIP Authentication tab.
D. Under the Outbound Settings > Assigned To field to ensure that your SIP User’s Outbound Settings are assigned to
Call Flows API. If not, make it so and click Save.
3. Create A Call Flow to Control SIP User Inbound and Outbound Calls
To forward incoming calls to your SIP User and enable them to place calls to the PSTN, you need to write a Call Flow that uses Voxology’s TRANSFER and control flow actions. The example Call Flow below can be used for simplicity.
NOTE: When using the Call Flows API to handle outbound calls initiated by SIP Users, it is good to be aware that the direction property in the callback request will (perhaps surprisingly) be "inbound", because the SIP User is first connecting via SIP Interface before the call gets placed to the PSTN.
A. ‘Copy/Paste’ the example Call Flow below into a text editor:
{
    "actions":[
        {
            "type": "IF",
            "condition": "$initiatedBy == 'sip_user'",
            "then": [
                {
                    "type":"TRANSFER",
                    "params":{
                        "no": "${apiNo}"
                    }
                }
            ],
            "orElse": [
                {
                    "type":"TRANSFER",
                    "params":{
                        "no": "sip:YOUR-INBOUND-URI"
                    }
                }
            ]
        },
        {
            "type":"HANGUP"
        }
    ]
}
B. ‘Copy/Paste’ the “Inbound URI” from your SIP User into the
noparameter, replacing "sip:YOUR-INBOUND-URI" (in the example above).
C. Save as a JSON file.
Now you will need to host the Call Flow and configure your Default Callback Configuration to control inbound and outbound calls from your SIP User.
4. Host Call Flow
Your Call Flow needs to be returned as the response to Voxology’s HTTP callback requests which are sent when the SIP User initiates an outbound call or when someone calls your inbound number. This can be done by either hosting the Call Flow as a static file in a cloud storage service where it can be fetched by the callback request, such as AWS S3, Azure or Google Cloud, or by programming your server to return the Call Flow in response to the callback request. We’ll use a static Call Flow hosted in AWS S3 for this guide.
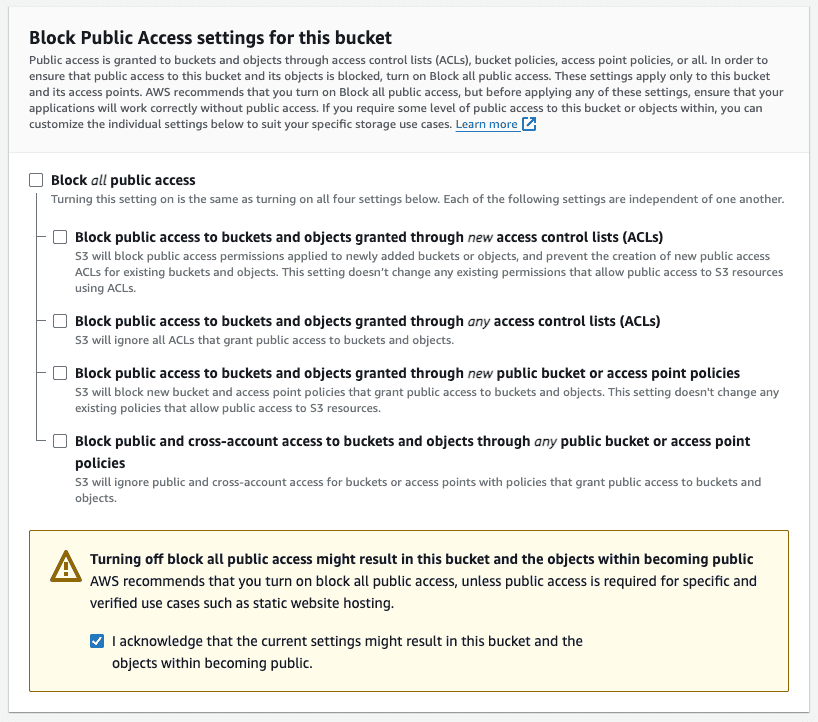
A. Sign into the AWS Management Console and navigate to S3.
B. Create a new bucket and deselect the box that blocks public access.
C. Check the box acknowledging you are allowing objects in the bucket to be publicly available.
D. Click Create Bucket.
E. Upload the JSON file you created with the Call Flow script.
F. Once uploaded, click the object to view the Properties and ‘Copy’ the Object URL.
5. Define Your Default Callback Configuration
To assign the Call Flow to your application you now need to set the 'Default Callback Configuration'.
A. Go to the Default Call Flows API Callback Configuration page/tab in the Portal.
B. Enable the Designate a Callback URL to where Voxology will send Callback Requests toggle.
C. ‘Paste’ the “Object URL” from your S3 Object copied in the previous step into the Callback URL field.
D. Set the Callback Method field to
GET.
E. Click Save.

6. Make and Receive Calls to Your Registered Device
Using a phone (other than your newly Registered Device) place a test call to the new phone number you assigned to the Call Flow API. If you properly configured the Call Flow and your SIP User, the call should be instantly forwarded to your Registered Device.
Finally, try placing a call from your Registered Device. If your Call Flow and SIP User are properly configured, you should be able to successfully make calls from your Registered Device.
To continue your exploration into Voxology’s PBX-style features, review our Extensions Getting Started Guide.